What’s new in the Technology Suite
See what's possible with the latest enhancements to IT Asset Manager and IT Help Desk.
The following enhancements incorporate many of your suggestions as we continue to improve Destiny for today’s students and educators. Click a month to expand it, and then click a title for more information on each feature. To expand all entries, click ![]() at the top-right of this page.
at the top-right of this page.
| IT Asset Manager |
Your district can now import user and location data into IT Asset Manager through the SIS Data Sync integration.
The integration syncs student and staff records nightly to keep data aligned with your student information system (SIS). It maps core user fields, including External ID, Email, First Name, Last Name and Role. It also supports building and role mapping.
| IT Asset Manager | Date: 6/14/2026 | Release: 26.2 |
With AI email ticketing, when an active IT Asset Manager user submits a request by email, AI populates the following request fields based on the email content:
- Request Category
- Problem Type
- Purpose
- Priority
With those fields populated, any configured approval paths, auto assignments, auto-notifications, and SLAs apply to the applicable request types.
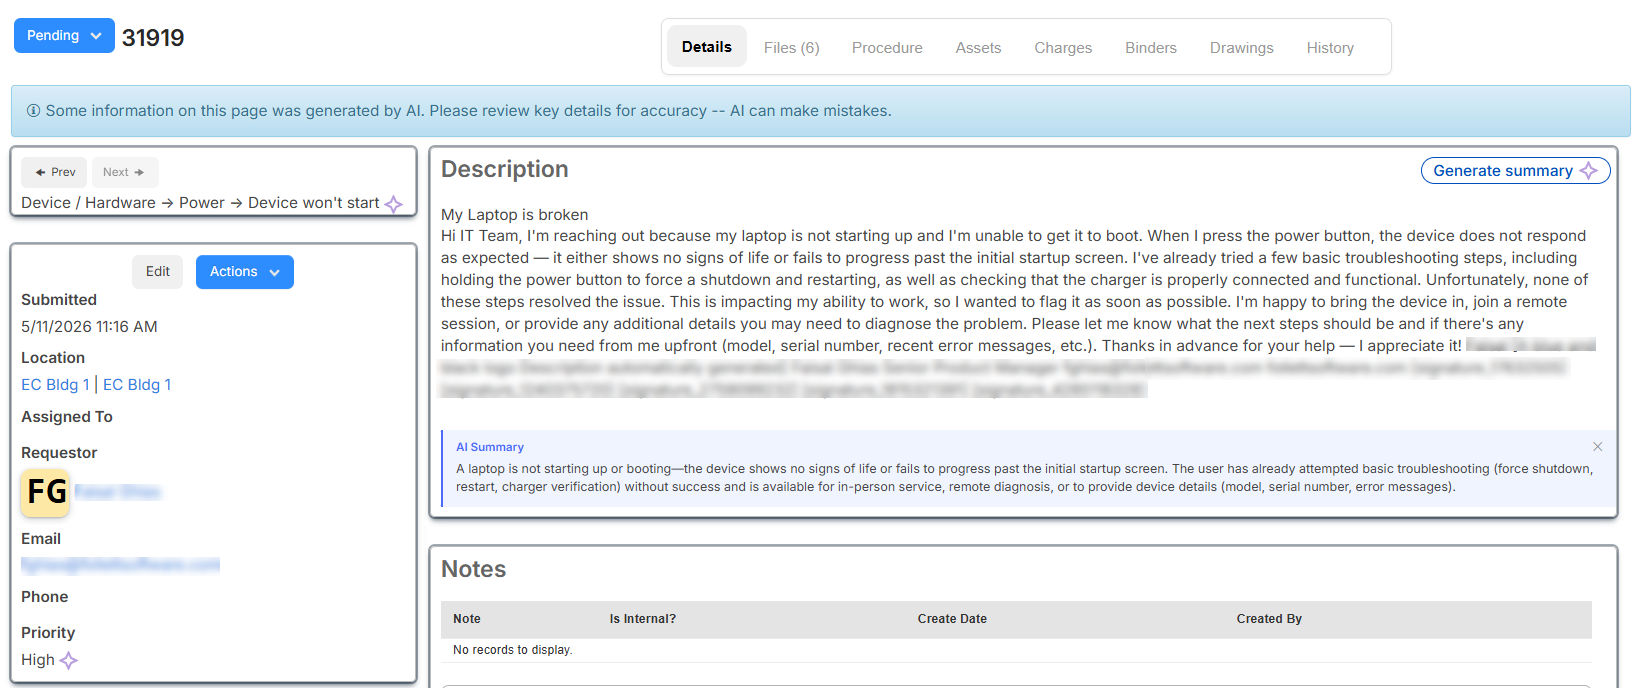
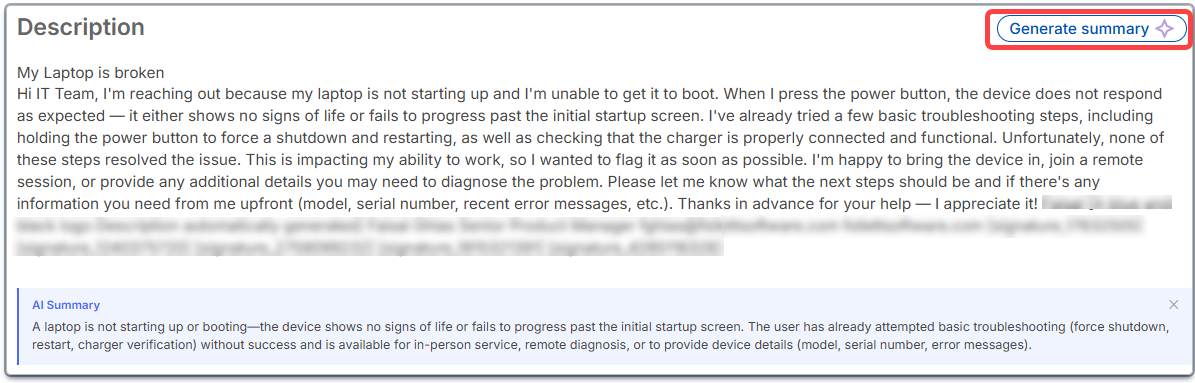
If a description exceeds 500 characters, regardless of whether a request is sent by email or through the app (web or Follett Software Ops), AI can generate a concise summary of the problem.
The request's History tab shows if fields were set by AI.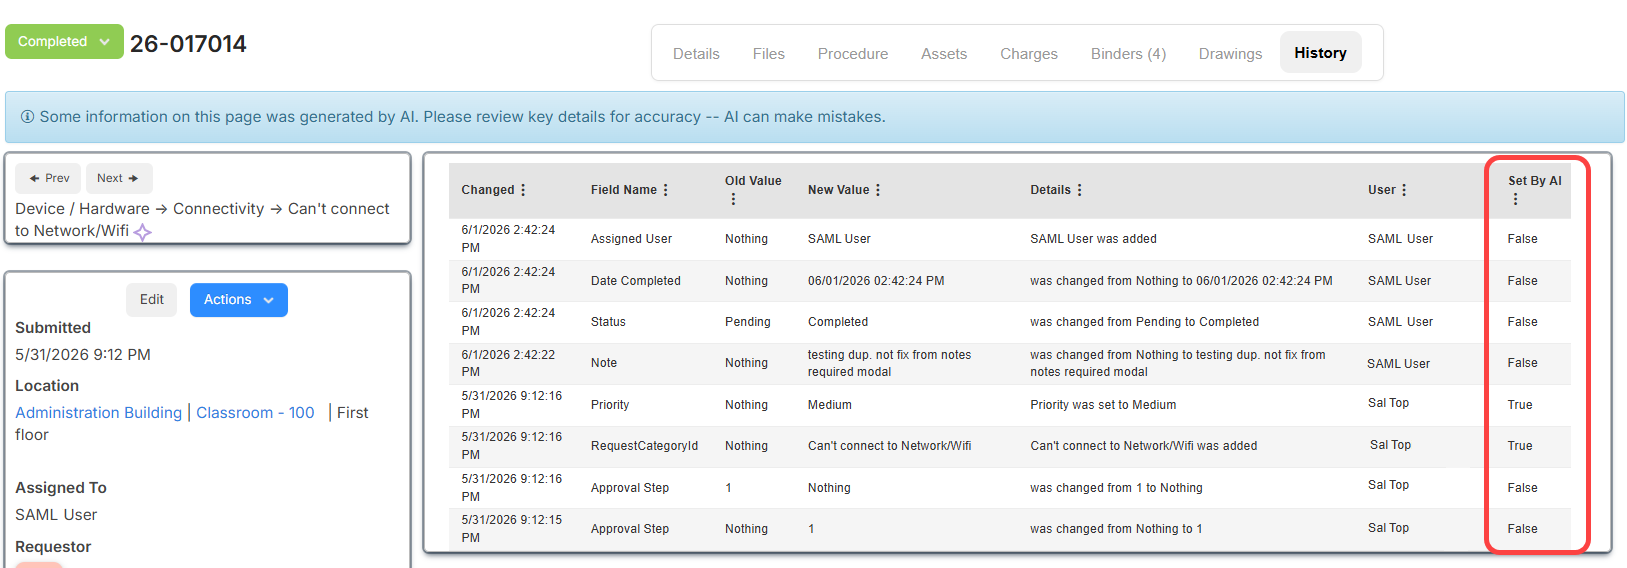
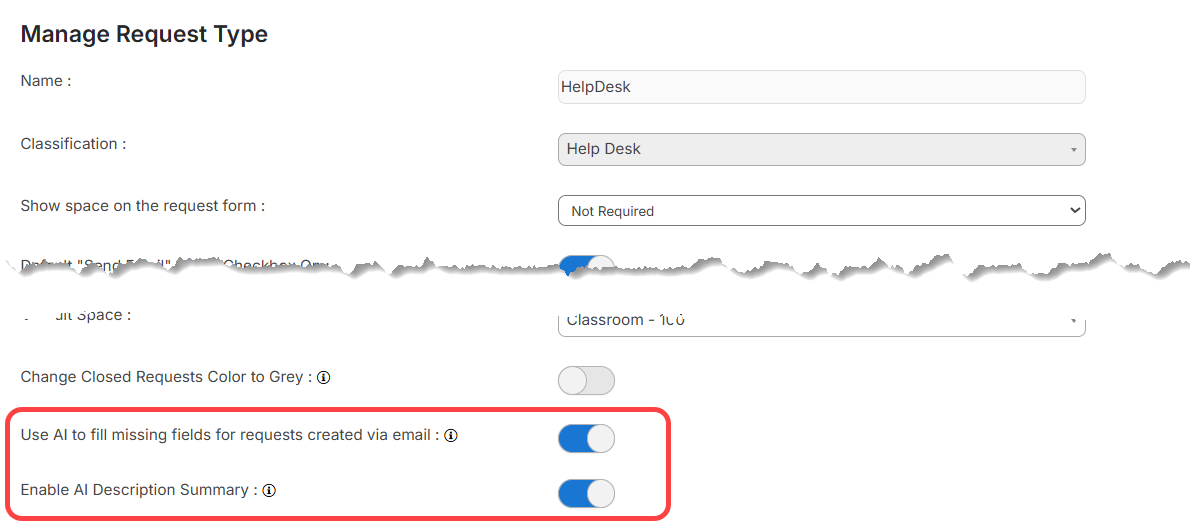
New request type settings that must be enabled to allow AI to complete fields and generate a description summary are:
- Use AI to fill missing fields for requests created via email
- Enable AI Description Summary
Learn more about AI email ticketing and setting up AI request type options.
| IT Asset Manager | Date: 6/14/2026 | Release: 26.2 |
IT Asset Manager now includes an internal documentation hub where IT teams can document solutions, standard procedures, and troubleshooting guides. Articles support rich-text formatting, images, and various file types. A new Manage Article Types page lets administrators add, edit, and delete the article types used to organize content.
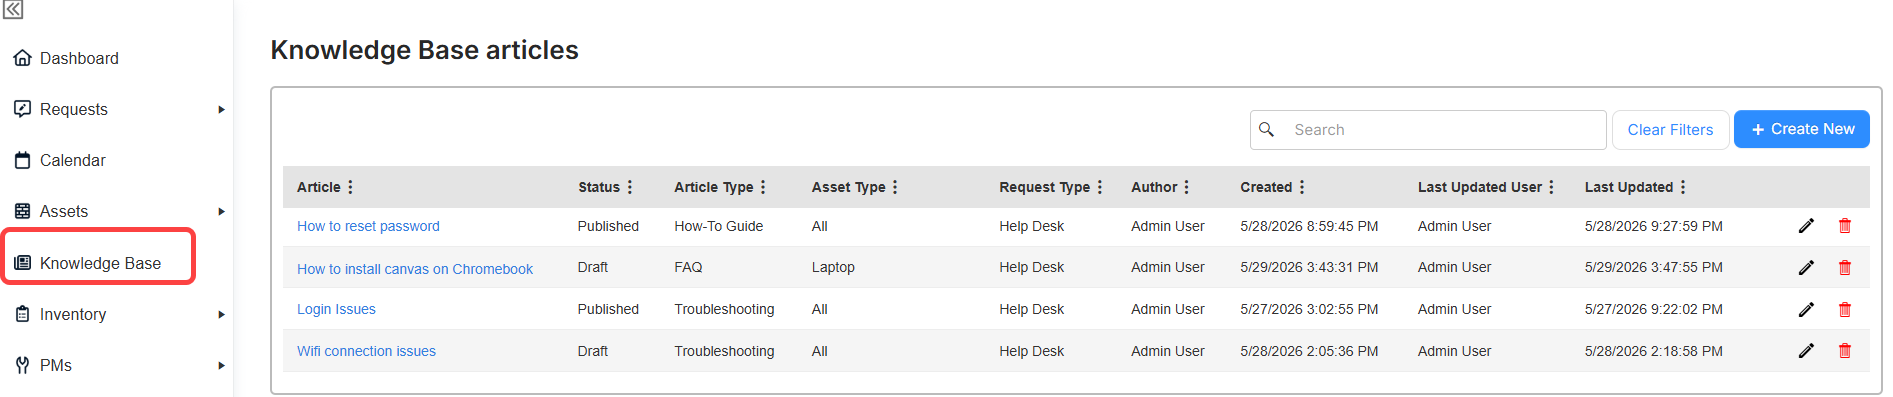
Two new role permissions are included for Knowledge Base access:
- View Knowledge Base Articles: Browse and read published articles based on the assigned asset type and request type restrictions.
- Manage Knowledge Base Articles: Create, edit, delete, and update article status.
Learn more about the Knowledge Base.
| IT Asset Manager | Date: 6/14/2026 | Release: 26.2 |
You can now create circulation rules to automate your asset checkout policies. Rules define when assets are due and related overdue charges. Set up rules based on asset type, user role, and/or building.

Learn more about circulation rules.
| IT Asset Manager | Date: 6/14/2026 | Release: 26.2 |
You can now add additional email addresses to the Manage Users page for asset circulation notifications. The addresses will receive asset check-in and check-out receipts, due date reminders, and overdue notices.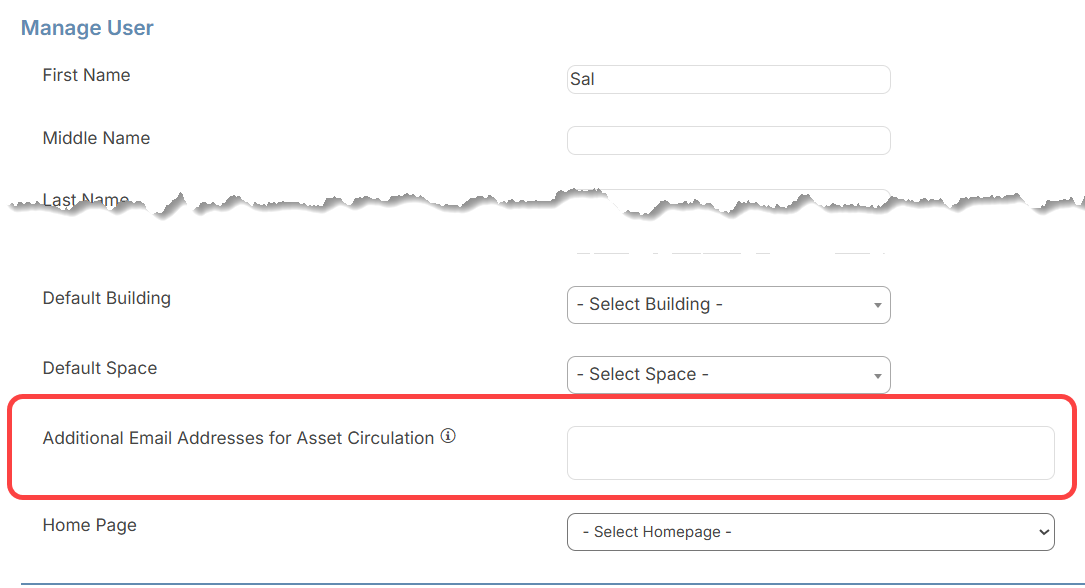
Learn more about managing users.
| IT Asset Manager | Date: 6/14/2026 | Release: 26.2 |
To make navigation more predictable and reduce tab clutter, Dashboard actions, asset transfer IDs, and Dashboard reports now open in the same tab from which they were launched.
Dashboard actions: Add asset, Check in, New request, and Check out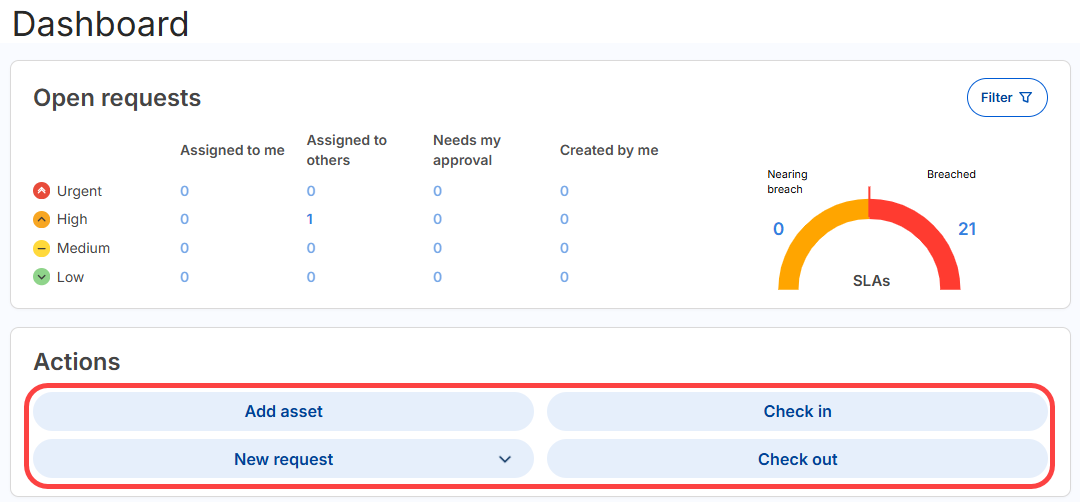
Transfer ID in Assets > Manage Asset Transfers

Reports
- Summary Dashboard
- Labor Dashboard
- Facilities Asset Dashboard
- Technology Asset Dashboard
- Total Cost Dashboard
| IT Asset Manager | Date: 6/14/2026 | Release: 26.2 |
When updating a request to On Hold from the Requests page, you are now prompted to select an on-hold reason and an off-hold date, matching the behavior on the request details page.
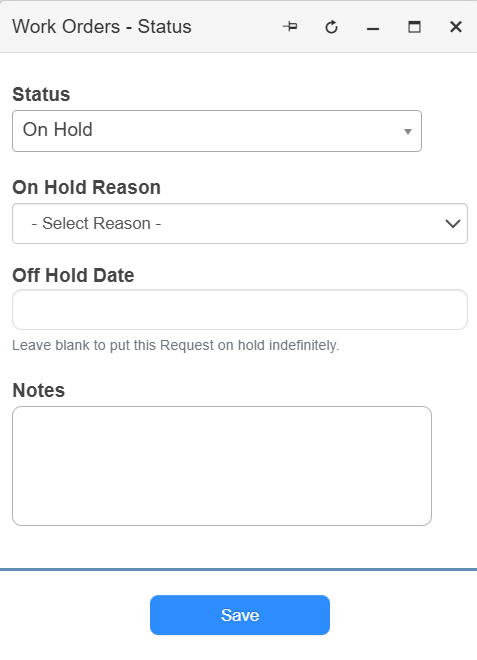
Learn more about putting requests on hold.
| IT Asset Manager | Date: 6/14/2026 | Release: 26.2 |
On asset and request list pages, you can now specify whether to select all items on a page or all items across all pages.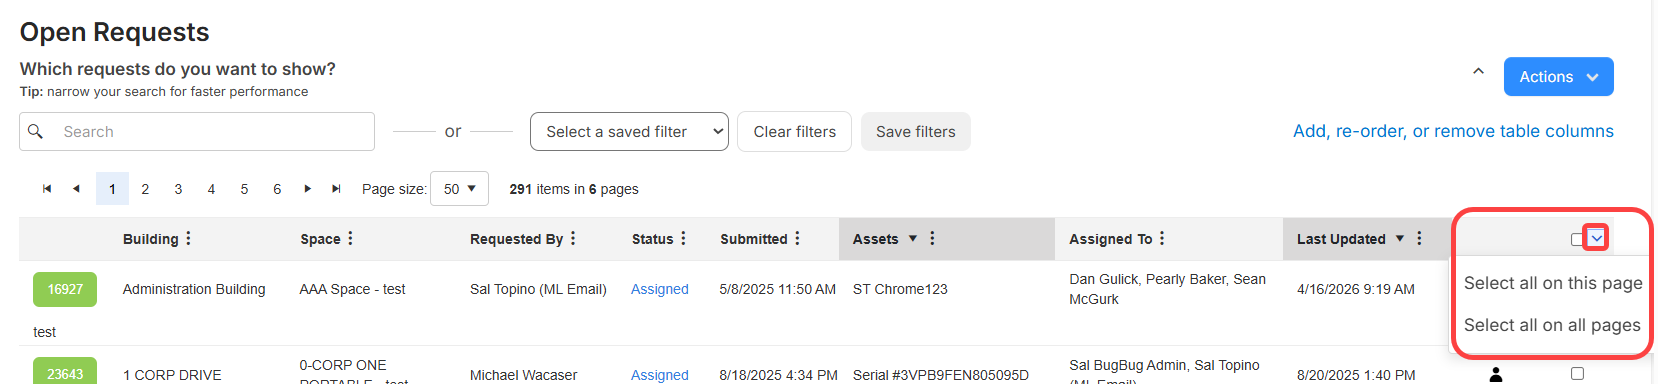
A new icon (![]() ) appears at the top of the 'Select all' column. After choosing an option, a banner at the top of the page indicates the number of items selected. To remove the selection, click Clear in the banner.
) appears at the top of the 'Select all' column. After choosing an option, a banner at the top of the page indicates the number of items selected. To remove the selection, click Clear in the banner.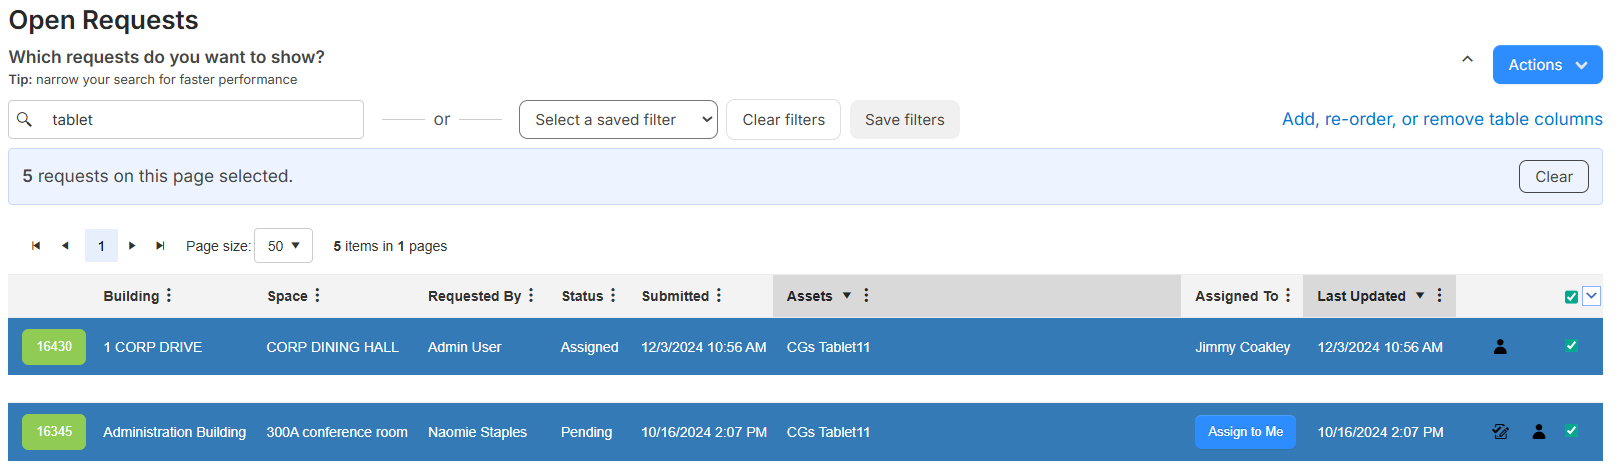
If you perform one of the following actions, the selected items are included:
- Asset pages:
- Mass Update
- Transfer Assets
- Print Details
- QR Report
- Perform Audit
- Request pages:
- Mass Update
- Merge Requests
- Print Details
- Delete
| IT Asset Manager | Date: 6/14/2026 | Release: 26.2 |
With the View User Details Administrative permission, you can now see a user's barcode on the User View page (Users > Manage Users, select a user).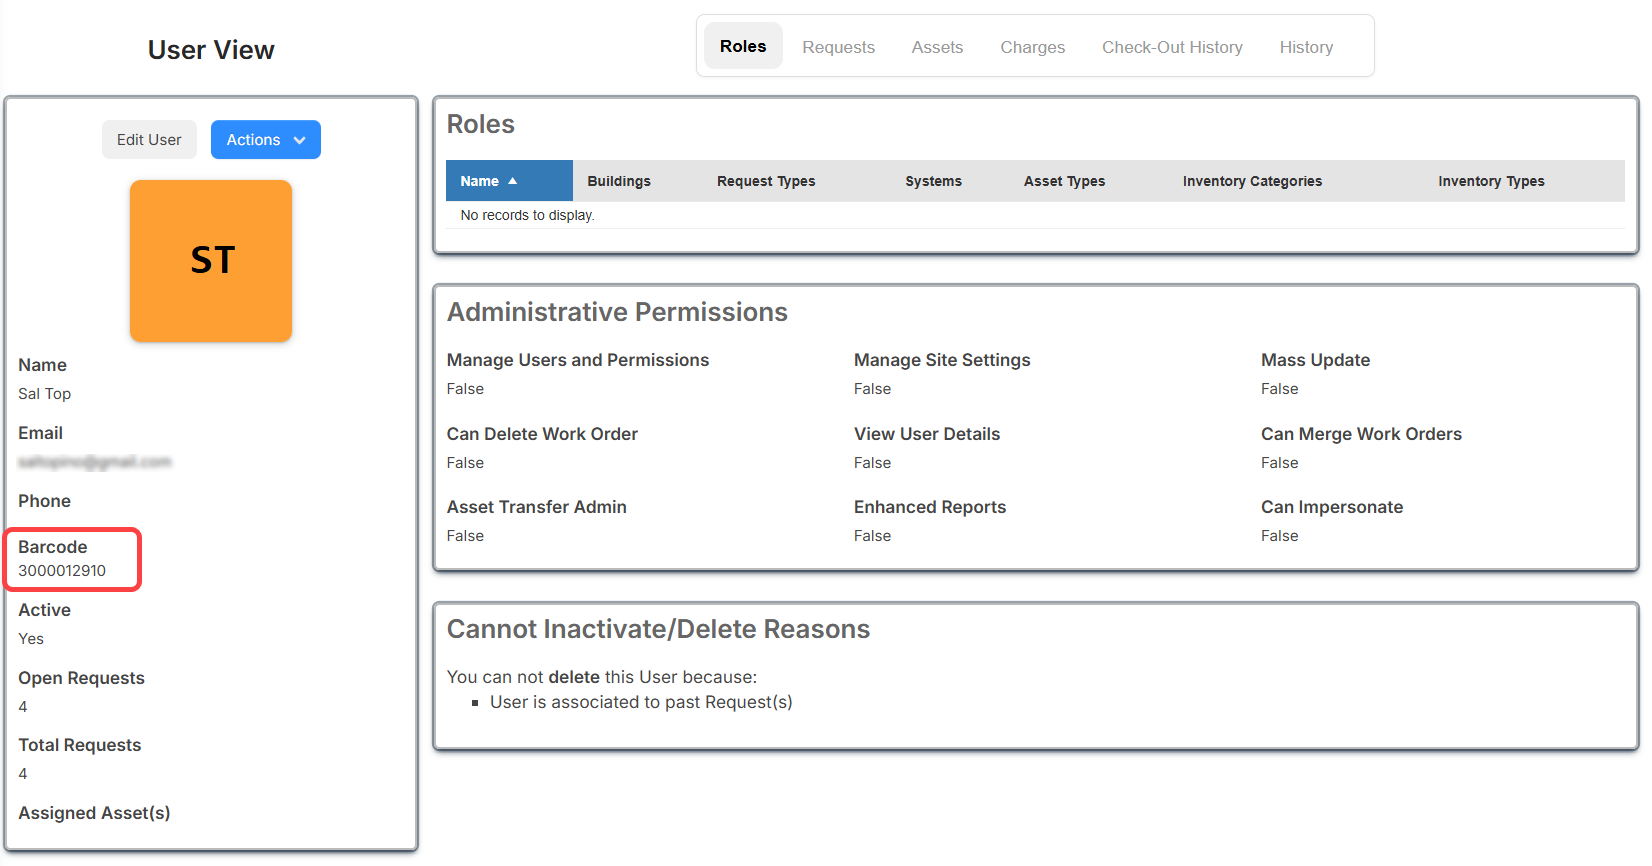
Learn more about managing users.
| IT Asset Manager | Date: 6/14/2026 | Release: 26.2 |
When you set filters for the 'Open requests' and Requests widgets, the filters persist when you log out. The next time you log in, the filters remain. They stay set until you clear or update them.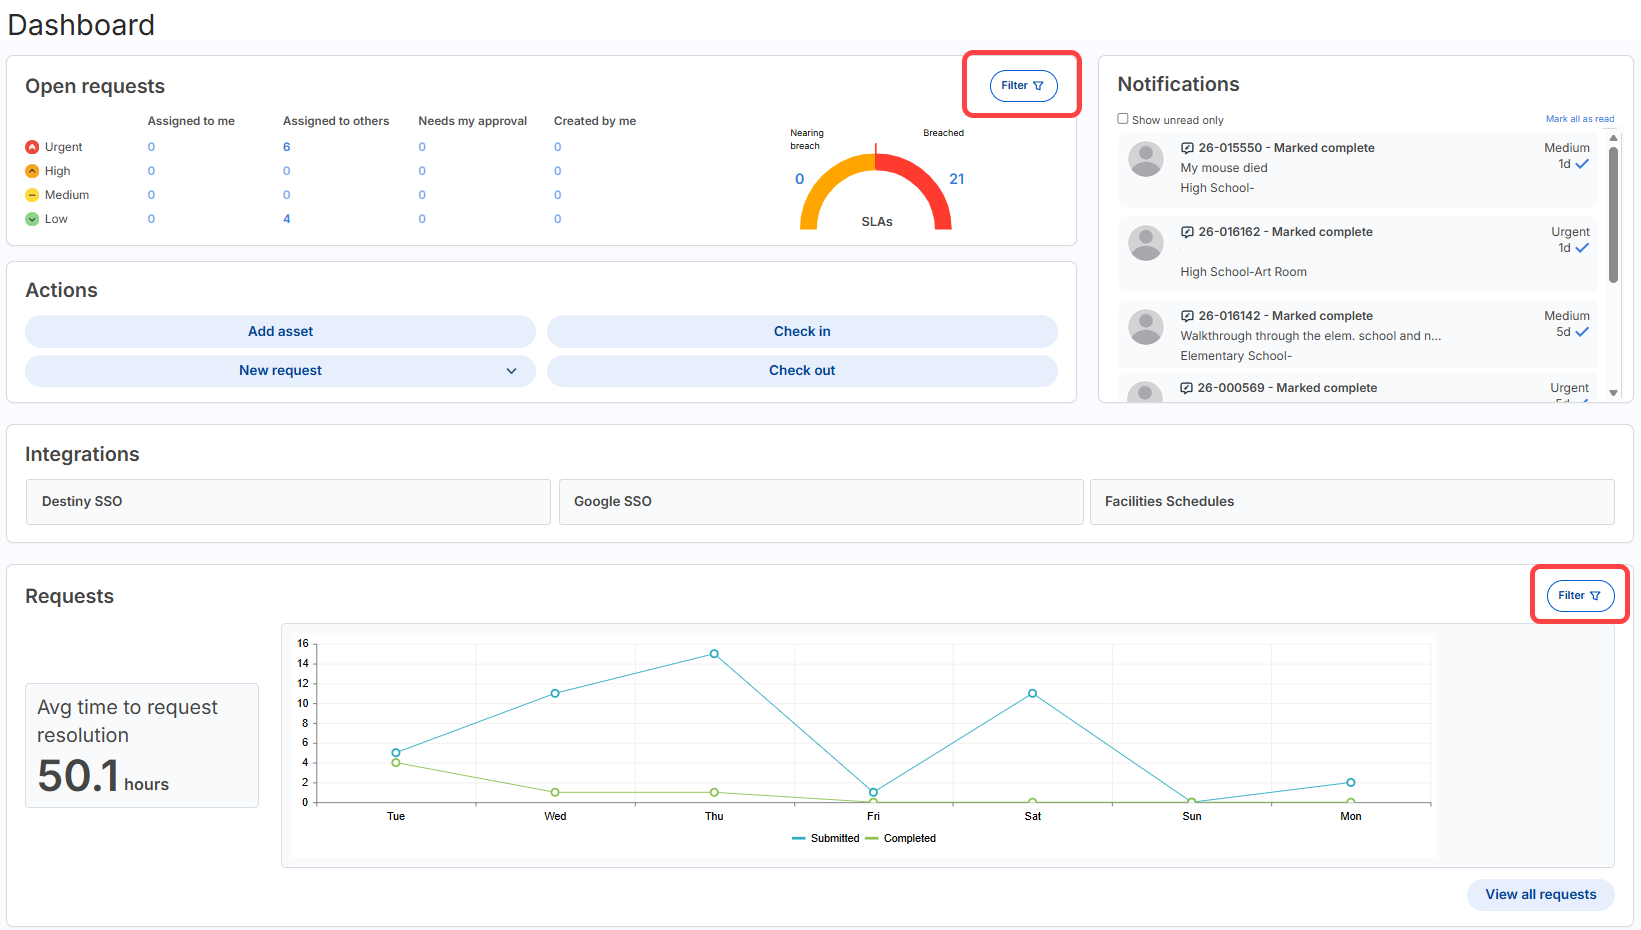
Learn more about the Dashboard.
| IT Asset Manager | Date: 6/14/2026 | Release: 26.2 |
Asset Import now supports additional fields that appear in the import template and the column-mapping step of the import wizard.
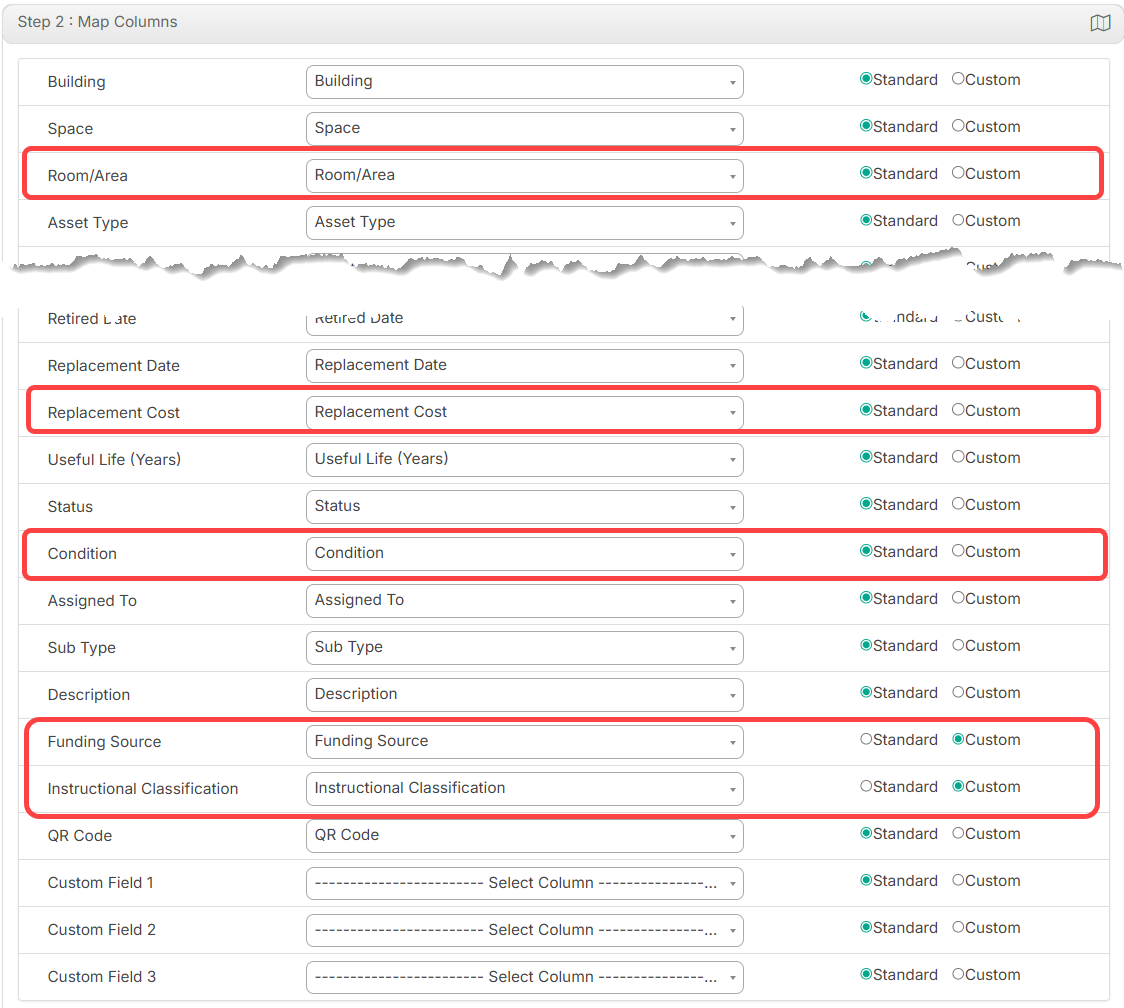
When you download the import template, the Condition, Funding Source, and Instructional Classification fields include drop-down values based on what is set up in Manage Custom Fields. The Excel file also includes a Dropdown Values sheet that lists the available values for those fields, along with an Asset Type column that shows all asset types that exist in IT Asset Manager at the time the template is downloaded.
Learn more about importing assets.
| IT Asset Manager | Date: 6/14/2026 | Release: 26.2 |
IT Asset Manager now supports automatic student inactivation through OneRoster. During the nightly OneRoster sync, students are inactivated if they are marked inactive or 'to be deleted' in the district's student information system (SIS).
Learn more about OneRoster.
| IT Asset Manager | Date: 6/14/2026 | Release: 26.2 |
Spaces now includes more fields, making it easier to track room information, maintenance context, and assigned staff in one place. These fields continue to be shared with Facilities Drawings.
On the Spaces list page, the space name now links directly to the space's detail page. You can also add external notes and edit space details from that page. All new fields are available as optional columns on the Spaces list page.

Learn more about spaces.
| IT Asset Manager | Date: 5/10/2026 |
Asset audits are now easier to manage while they are in progress.
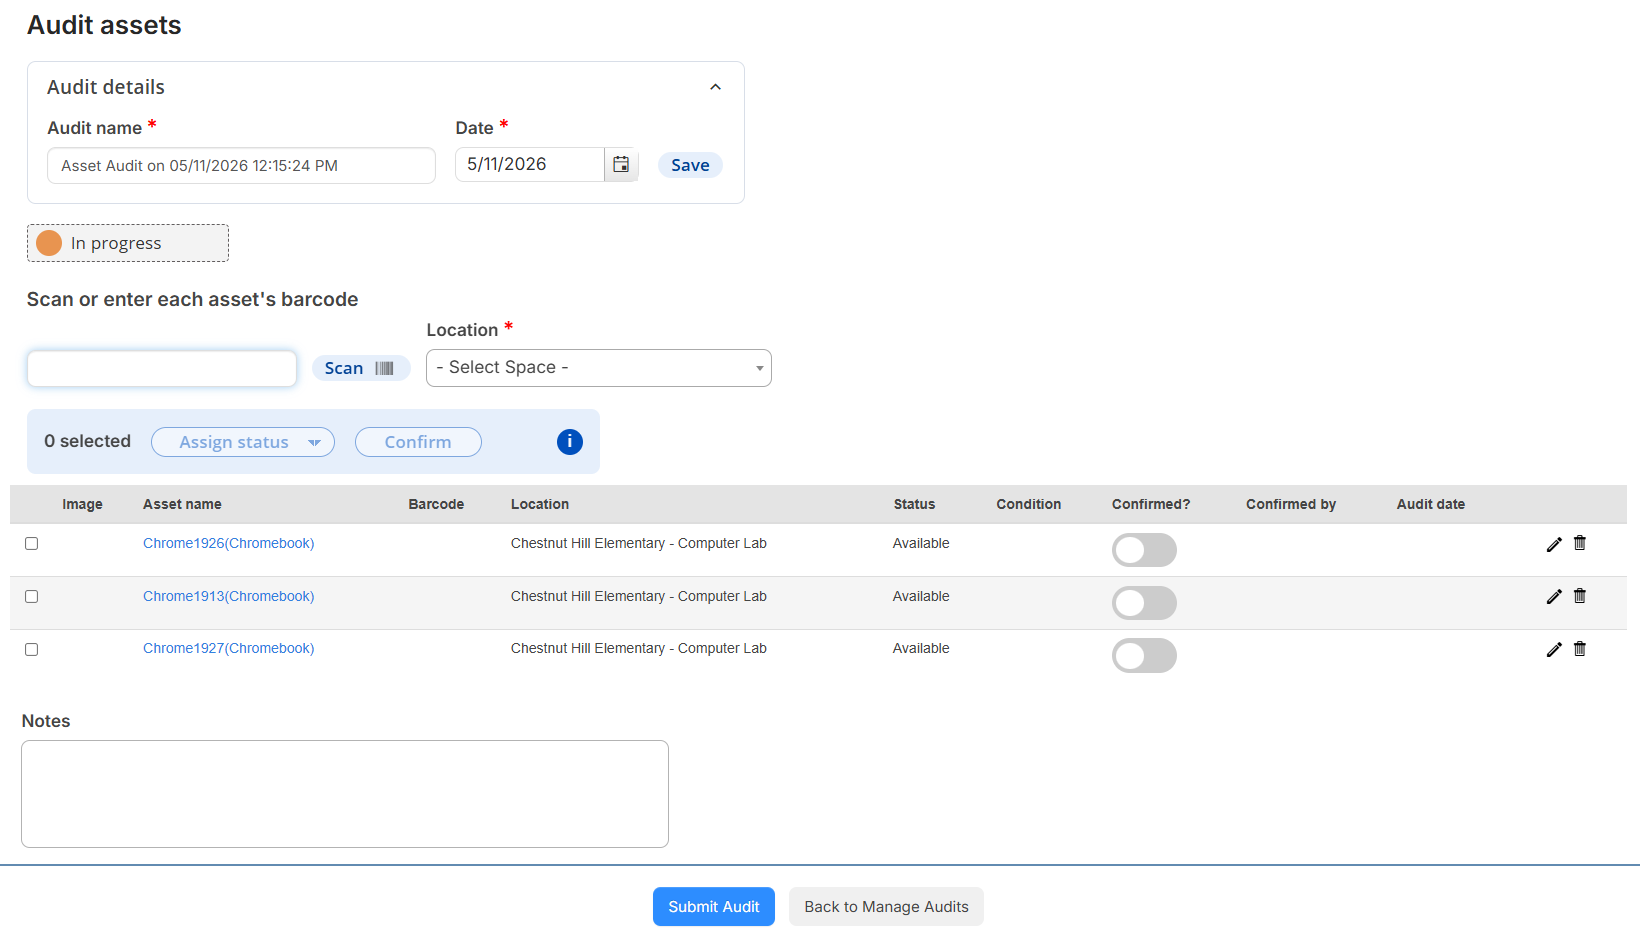
Updates include the following:
- The Perform Audit page has been renamed 'Audit assets'.
- The audit name and date appear in a collapsible 'Audit details' section and can be updated anytime before the audit is completed.
- The status indicator is more prominent and updates in real time.
- A bulk action toolbar lets you assign a status or confirm multiple assets at once.
- Columns in the asset table were rearranged, have new labels, and include a row-select checkbox; and the Confirmed checkbox is now a toggle.
- When an asset is confirmed, that row is updated with the user and audit date. A row cannot be selected for bulk actions unless it is unconfirmed.
- You can edit an asset and update its Location, Status, and/or Condition using a drop-down.
- To save Notes, you now click 'Back to Manage Audits'.
- When you submit an audit with unconfirmed assets, a warning appears that lets you proceed or return to confirm remaining assets.
Learn more about asset audits.
| IT Asset Manager | Date: 3/31/2026 |
The Follett Software Ops app includes several updates that make it more efficient to use. You can now do the following:
- Log in using single sign-on with SAML for Google, Microsoft, or Okta.
- Edit the Description, Notes, Priority, Complete By, Budget Code, and Project fields on a request's details.
- Add purchases, inventory, assets, and files to a request.
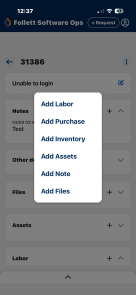
- View and edit an asset's details, check it out or in, and view its history.
Learn more about the Follett Software Ops app.
| IT Asset Manager | Date: 3/1/2026 | Release: 26.1 |
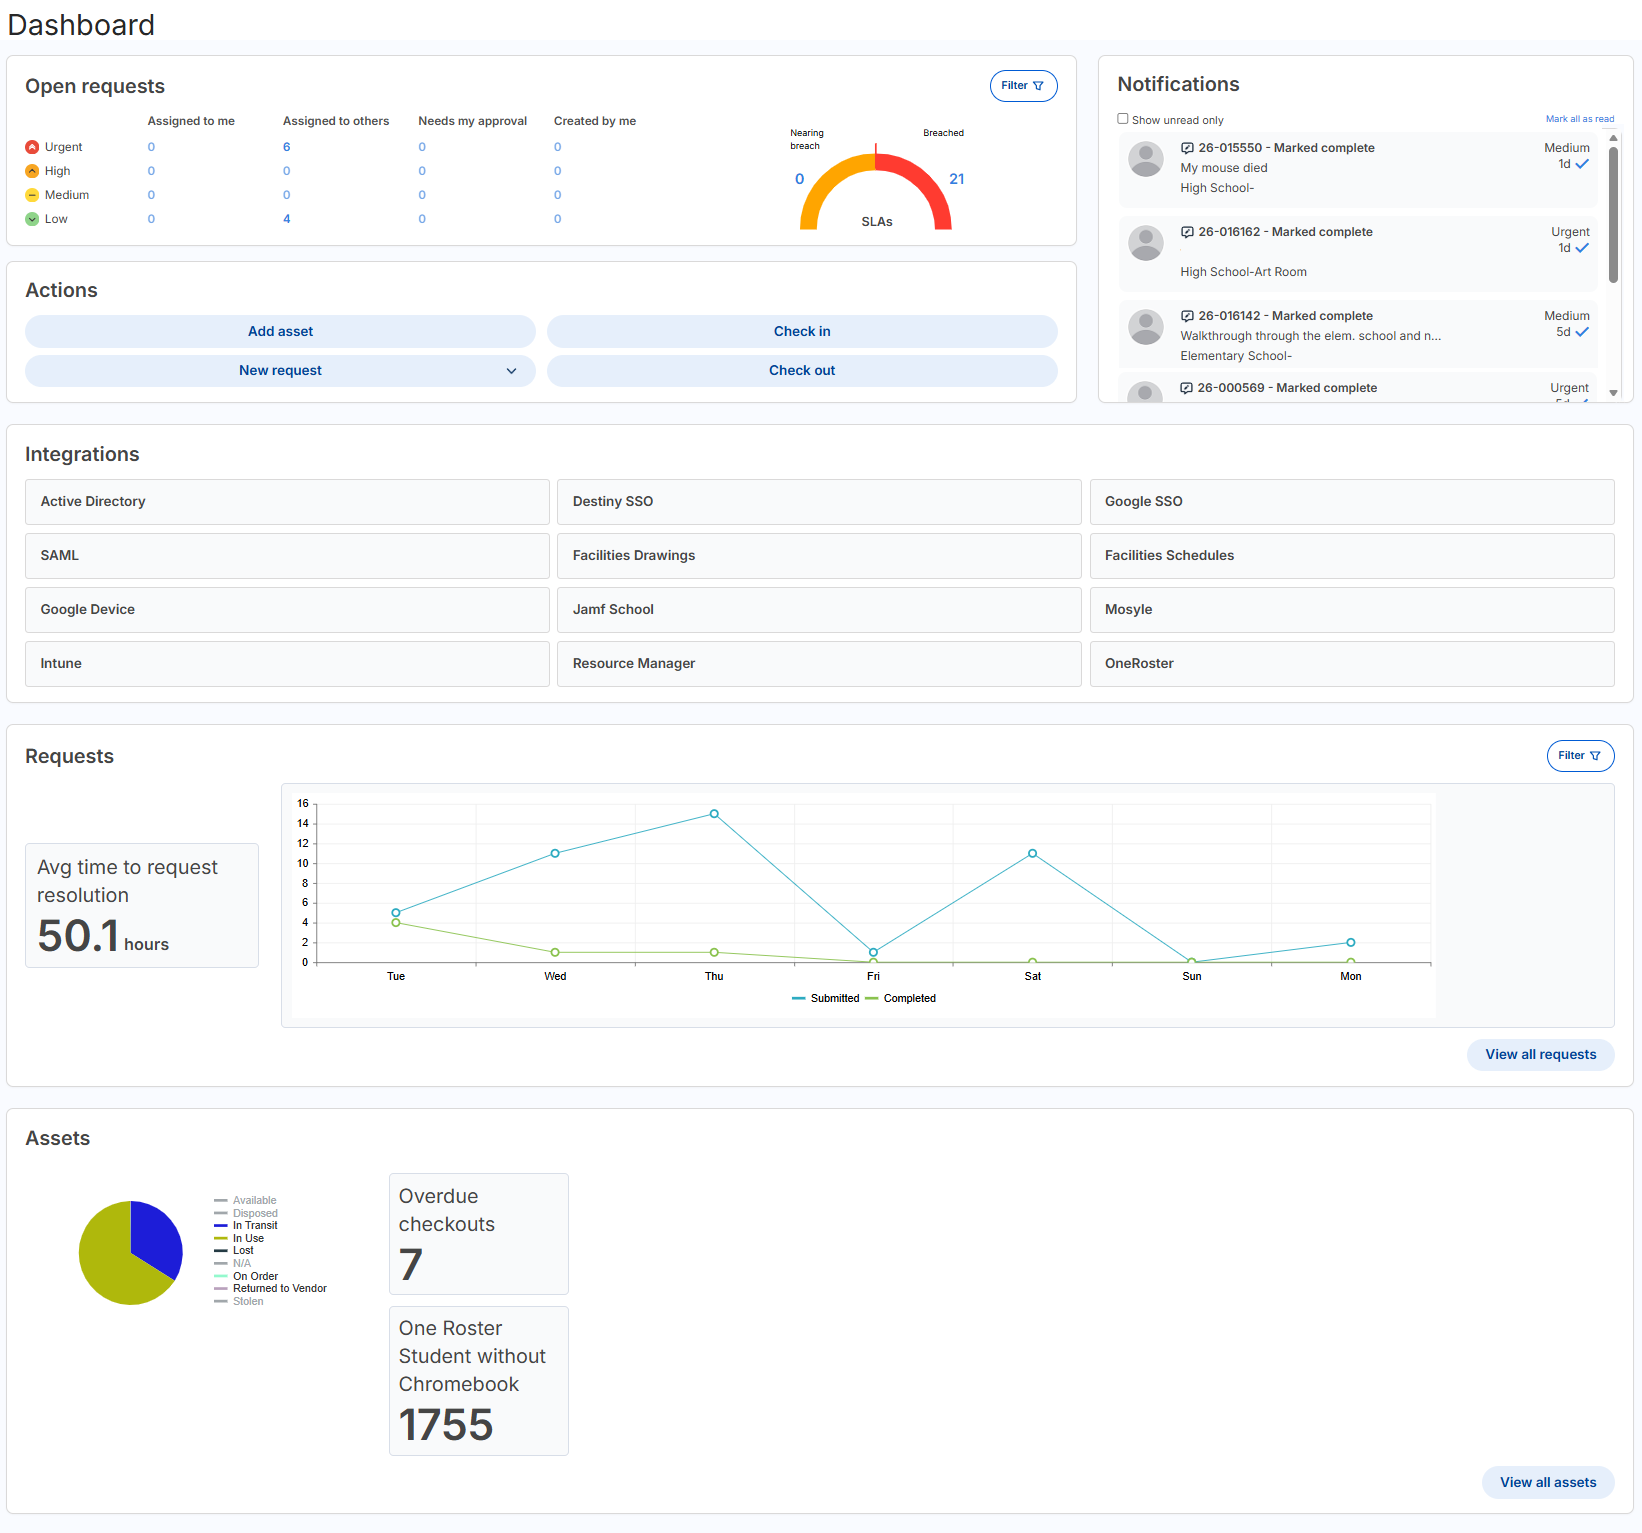
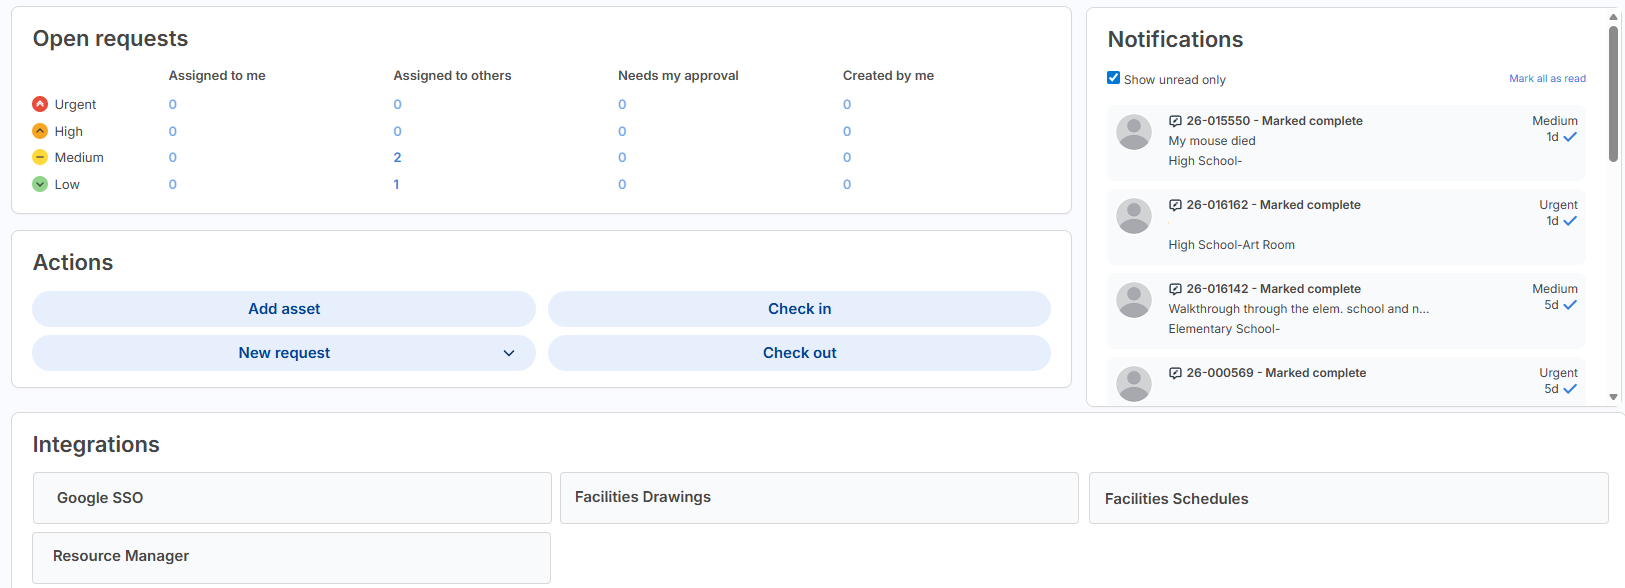
More changes have been made to the Dashboard page since its redesign in the 25.6 release. It now includes:
- Service level agreements in the 'Open requests' widget.
- A Requests widget showing the average time to request resolution.
- The option to filter in the 'Open requests' and Requests widgets.
- An interactive Assets widget showing asset status via a pie chart.
Learn more about the Dashboard.
| IT Asset Manager | Date: 3/1/2026 | Release: 26.1 |
The Manage Assets page has several updates, including the following:
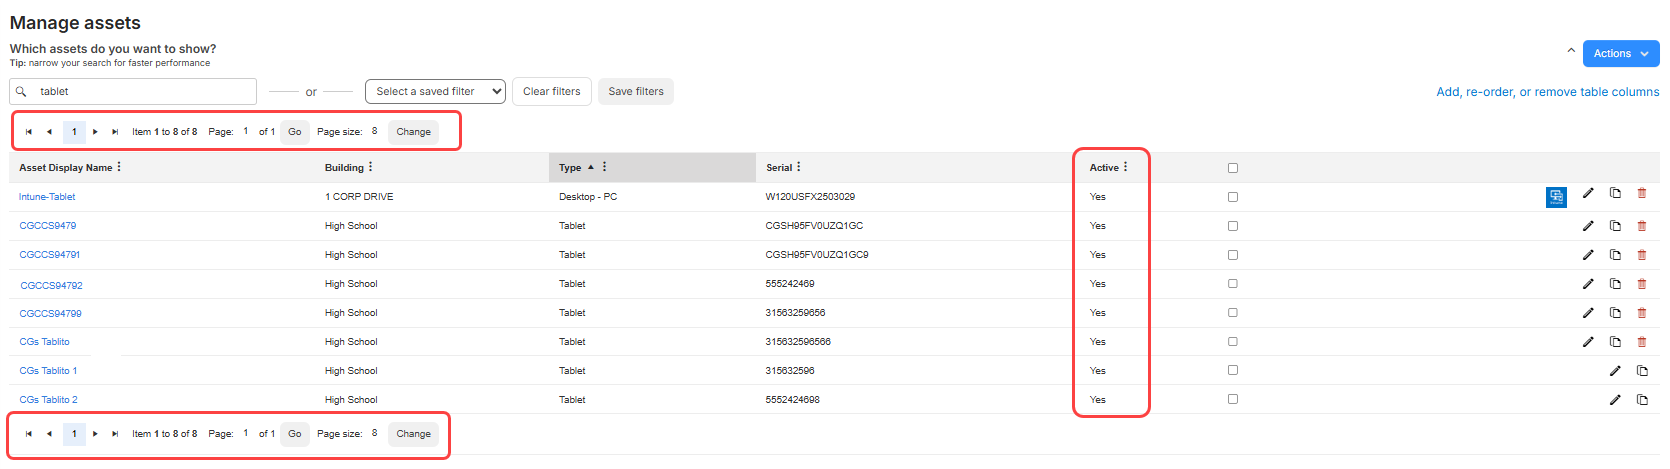
- Pagination, number of items, and number of assets now appear at the top and bottom of the table.
- The Active column shows Yes or No instead of a checkbox.
- To inactivate an asset, access the asset's details page instead of using an icon on the Manage Assets page.
- When you do not select any assets and try to perform Actions > Mass Update, Transfer Assets, QR Report, or Perform Audit, a message informs you to select one or more assets and try again.
Learn more about managing assets.
| IT Asset Manager | Date: 3/1/2026 | Release: 26.1 |
When you perform an audit, you can now scan asset barcodes. If the assets are part of the audit, they are confirmed. If an asset is not part of the audit, it is added automatically.
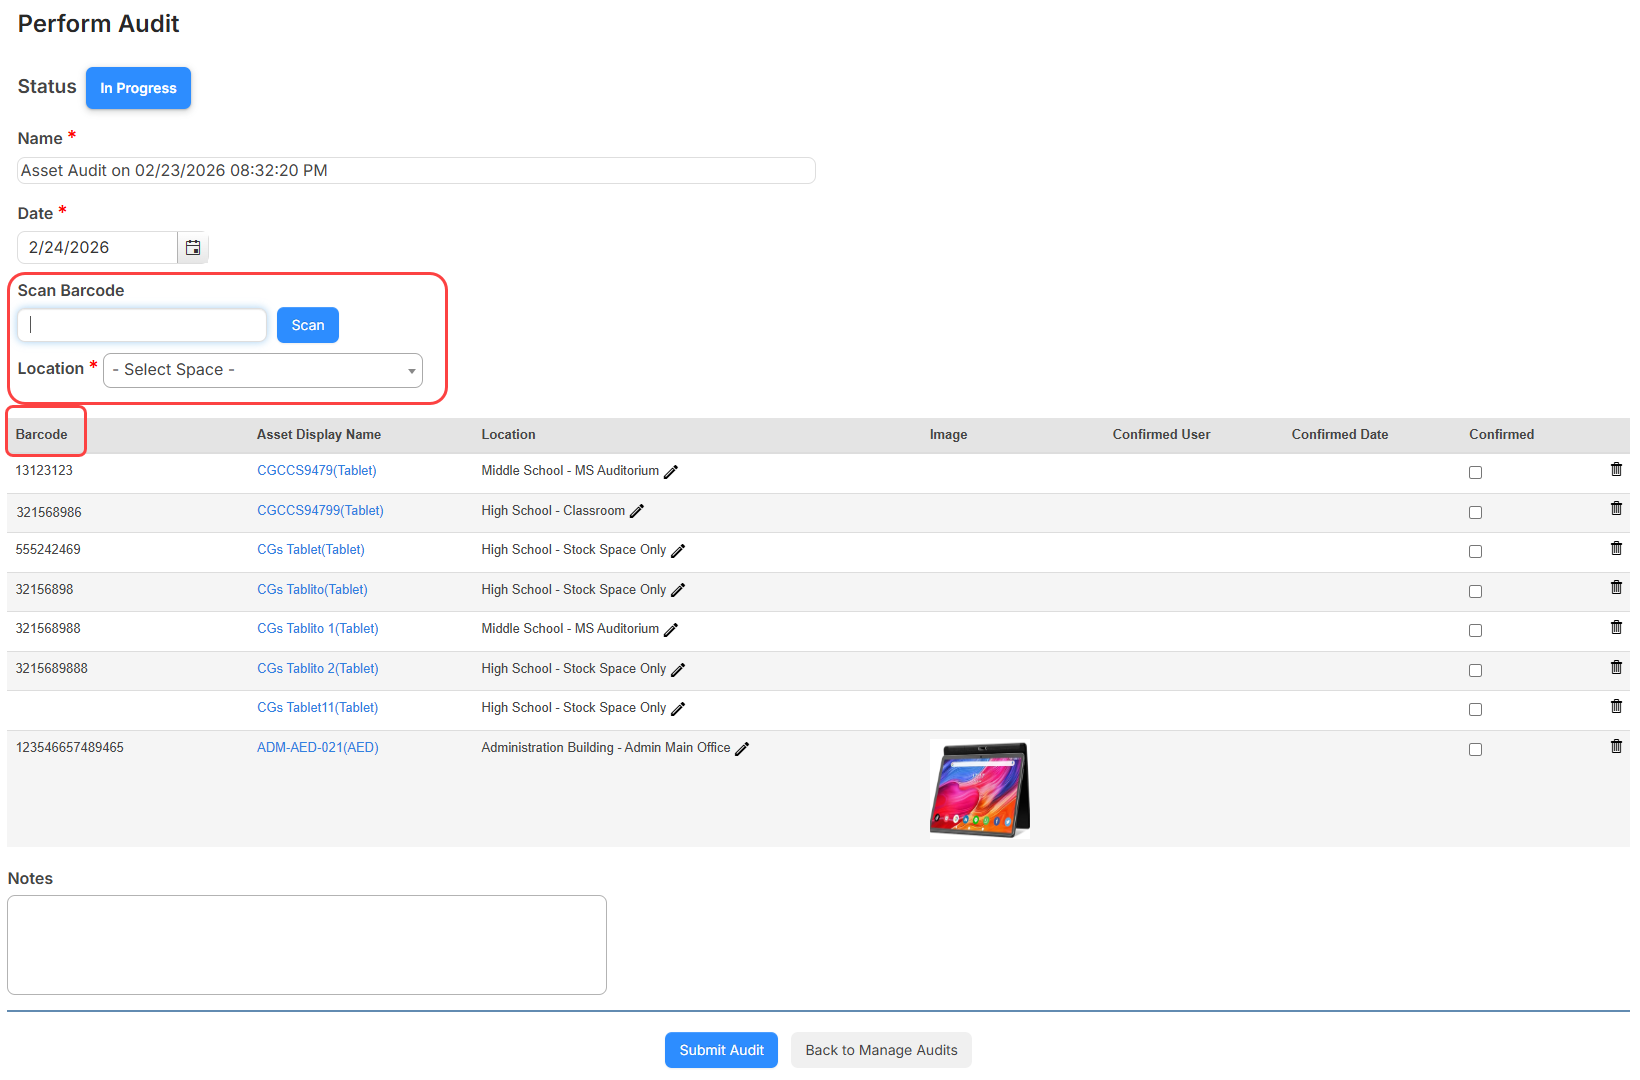
When you perform an audit, you will see the following changes related to the Scan Barcode option:
- A new Location drop-down appears below the Scan Barcode field. A selection is required when you scan or enter a barcode.
- If you have a carriage return setting for your scanner, the scan is done automatically. Otherwise, you can click Scan.
- When you scan an asset barcode that is part of the audit, if the location is different than the one you selected, the location is updated. If the asset is not part of the audit, it is added to the audit and the location is updated to what was selected.
- The table now shows a Barcode column instead of ID.
- If a scanned device has a status of In Use, Lost, or Stolen, a message asks if you want to update the status to Available.
- Assets with a status of In Use can be checked in when adding them to the audit.
Learn more about managing asset audits.
| IIT Asset Manager | Date: 3/1/2026 | Release: 26.1 |
The Quick Circulation page has several updates to help you when circulating assets, including the following:
- On both Check Out and Check In, there is text above the Scan Barcode field to remind you to scan a user barcode and then the asset barcode.
- If an asset cannot be checked out, a message appears letting you know the reason, such as the asset is already in use, lost, stolen, or the barcode is not found.
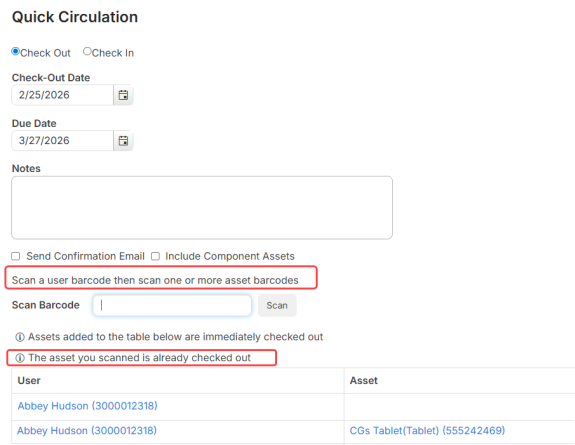
- After checking out or in an asset, the table at the bottom of the page shows both the user name and barcode, along with the asset name and barcode.
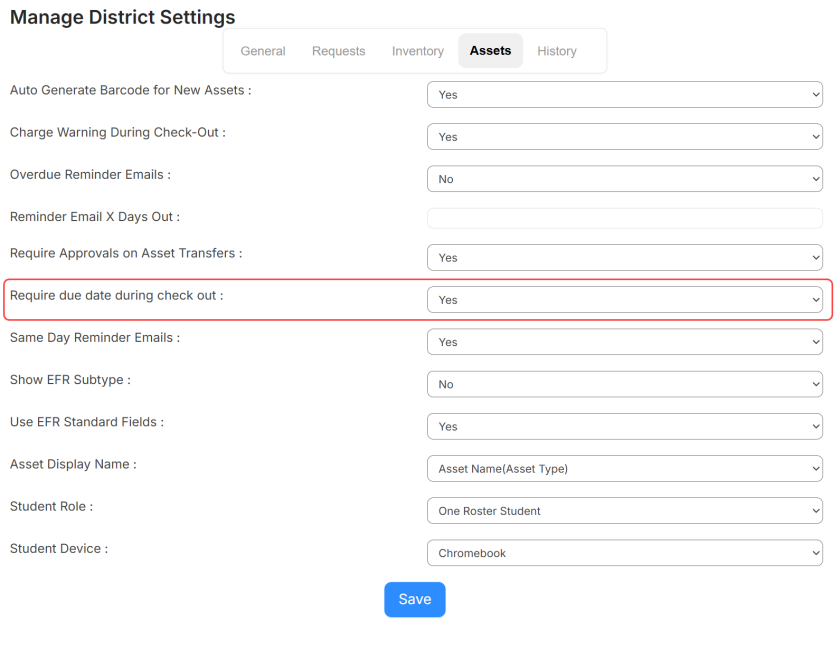
- Administrators can now require a due date when checking out assets. If this option is set to yes, a due date is required wherever you check out assets, except Mass Circulate.
Learn more about Quick Circulation and General Settings.
| IT Asset Manager | Date: 1/19/2026 | Release: 25.6 |
The newest Follett Software product is IT Asset Manager. Use it to manage all your technology devices. Students and staff can create support requests, while IT staff can assign and track them. Administrators can run reports to view the number of requests, labor costs, purchase costs, inventory, request response times, and more.
Learn more about IT Asset Manager.
| IT Help Desk | Date: 1/19/2026 | Release: 25.6 |
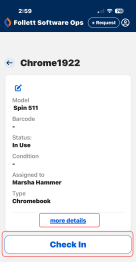
The new Follett Software Ops app lets you create and view requests on the go. Based on your permissions in the web app, you can also change a request status, view assets, add notes and labor, and scan assets.
Learn more about the Follett Software Ops app.
| IT Help Desk | Date: 1/19/2026 | Release: 25.6 |
The redesigned dashboard gives you a comprehensive view of your requests and assets at a glance:
- See open requests organized by priority and assignment.
- View recent notifications with improved formatting.
- Access quick actions for common tasks.
- Track request trends with visual charts.
Learn more about the Dashboard.
| IT Help Desk | Date: 1/19/2026 | Release: 25.6 |
Two new columns make it easier to manage users.
Create Date column
When a user is created, whether manually or through a sync, a Create Date is stored in IT Help Desk. Create Date is now an available optional column on the Manage Users page. The date and time appears in the column when selected.
Create Method column
To make troubleshooting easier, when a user is added to IT Help Desk, how the user was created is logged. You can add Create Method as a column to the Manage Users page.
Note: This column only shows data for new users added after the 25.6 release. Existing users will show N/A in the column.
The column logs when a user is created in any of the following ways:
- Manually on the Manage Users page and the Check-Out Assets page, using the + Add User button
- Via a custom form, email, or import
- Google SSO or Destiny SSO
- Active Directory
- SAML Azure, SAML Classlink, SAML Google, or SAML Okta
- OneRoster
- A user is created in FacilitiesDrawings and synced
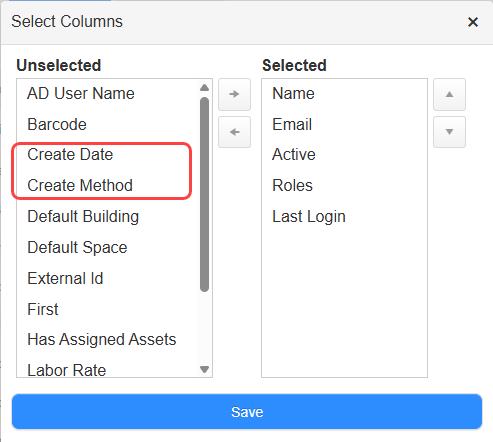
You can sort and filter on both the Create Date and Create Method columns.
Learn more about managing users.
| IT Help Desk | Date: 1/19/2026 | Release: 25.6 |
There are many new fields on the Manage Users page. You can't add these fields as columns to the Manage Users page, and they won't appear on a user's details page.
New fields on the Manage Users page include:
- Middle Name
- Mobile Phone Number
- Name Suffix
- Secondary Phone
- Secondary Mobile Phone
- Secondary E-Mail
- Alt ID
- State ID
- District ID
- Grade Level
- Graduation Year
- Birthdate
- Locker
Address is in a separate collapsible section. You can add primary and secondary addresses. Address fields include:
- Address 1
- Address 2
- City
- State
- Zip
Learn more about managing users.
| IT Help Desk | Date: 1/19/2026 | Release: 25.6 |
Before seeing data on the View All Requests and View All Assets pages, you now need to search or apply a filter. This update will load data quicker.

In addition, the following updates were made to buttons and links on all pages that let you view requests and assets:
- If you filter on a column, a filter icon appears in the column header. To sort a filtered column, click the filter icon to see the sort icon.
- Clear filters sets the page back to showing no data.
- The Columns button is now a link called Add, re-order, or remove table columns.
- The delete icon is red.
- Inactive requests or assets are now gray instead of red.
When filters are set, the next time you access that page, the filters will continue to be applied.
| IT Help Desk | Date: 1/19/2026 | Release: 25.6 |
Funding Source and Instructional Classification are now single-select drop-down fields that can be added to asset records of a specific type. Users with the Manage Site Settings permission can customize these fields, creating unique category names and linking them to specific asset types. For example, maybe you want the PTO funding source linked to iPads.
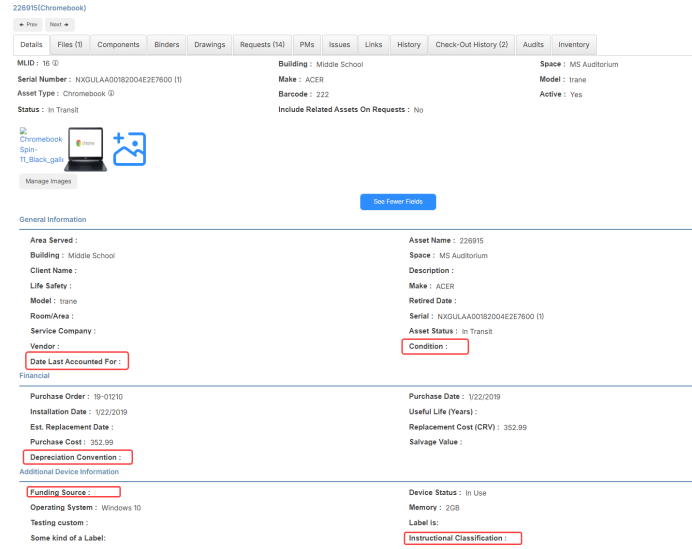
There are also new EFR standard fields in asset records:
- Condition: Track if an asset is new, good, fair, poor, usable, damaged, or unusable.
- Date Last Accounted For: Manually enter the date you accounted for an asset.
- Depreciation Convention: Determine how much an asset depreciates over the course of its life. This is based on IRS depreciation conventions of annual, half-year, mid-month, and mid-quarter.
Learn more about managing custom fields and assets.
| IT Help Desk | Date: 1/19/2026 | Release: 25.6 |
Administrators can enable a new 'Auto Generate Barcode for New Assets' field in General Settings > Assets tab. When an asset is created – either manually or via an asset import –IT Help Desk will automatically generate a barcode if that field is blank.
Barcodes will use Code 39 Generic format. They will be 10 characters, start with a 5, and can contain numbers, uppercase letters, and the following characters: minus (-), plus (+), period (.), dollar sign ($), slash (/), and percent (%).
Learn more about general settings and managing assets.
| IT Help Desk | Date: 1/19/2026 | Release: 25.6 |
Duplicate barcodes are now supported. When duplicate barcodes are found, you are required to select the correct asset from a pop-up. This pop-up will appear on pages where you can search for assets, such as Check In, Check Out, Quick Circulation, when adding an asset to a request, and when creating a request.
During mass circulation, the checkout is not completed and a note is added to the error log.
Learn more about assets.